People prefer websites that load quickly because it keeps their attention. Slow-loading pages often make visitors leave and look for information elsewhere.

There are many ways to improve your webpage speed, like reducing CSS and JavaScript sizes or cutting down on CDNs. However, these can sometimes make your site look bad. A better option is to increase speed by using DNS prefetch and preconnect.
I found that in HTML5, using DNS prefetch helps increase your webpage speed by preloading cross-domain resources with DNS prefetching and preconnecting.
What is DNS Prefetch (rel='dns-prefetch')?
DNS Prefetch or Preconnect tells web browsers that some resources on the website, like images, CDNs, fonts, videos, and files, are loading from specific websites. This helps the browser locate these resources faster, reducing its workload and increasing loading speed. If you have any questions, check my website.
Does it DNS Prefetch works on all browsers?
Yes, DNS Prefetch and Preconnect can increase your webpage speed, but they don't work with older versions of browsers. They only work with current browsers.
- IE 9 and Higher Verions
- Google Chrome
- Microsoft Edge
- Firefox 3.5 and Higher Versions
- Safari 5+
It's all about means This is well work with moder browsers by help the browser for DNS resolving.
What is Preconnect (rel='preconnect')?
Preconnect is similar to DNS Prefetch but has some different functions. In addition to DNS lookup, it handles TLS and TCP handshakes between domains. Preconnect lets browsers establish a connection before sending HTTP requests to the server.
For this reason, it eliminates roundtrips from the user's request path. You can use preconnect with the following example code.
<link href='//itisuniqueblog.com' rel='preconnect'/>
Using preconnect is similar to using DNS Prefetch. Just change rel='dns-prefetch' to rel='preconnect'.
How to use preconnect and dns-prefetch in Blogger and WordPres?
That's very easy to add preconnect and dns-prefetch in your website insert this code in just between head open <head> and head close </head>.
How to add dns-prefetch and preconnect in Blogger Site?
Step #1: Login your Blogger account Open you Blogger Dashboard.
Step #2: In a side bar you see Theme section just click on this then click on this arrow down icon you see Edit HTML button click on this they redirect you in your website edit codes.
Step #3: Then find head open like this <head> and copy belwo codes according to your needs and paste head open <head> code.
<link href='//www.googletagmanager.com' rel='dns-prefetch'/>
<link href='//www.googletagmanager.com' rel='preconnect'/>
<link href='//www.youtube.com' rel='dns-prefetch'/>
<link href='//www.youtube.com' rel='preconnect'/>
<link href='//www.googleapis.com' rel='dns-prefetch'/>
<link href='//www.googleapis.com' rel='preconnect'/>
<link href='//blogger.googleusercontent.com' rel='dns-prefetch'/>
<link href='//blogger.googleusercontent.com' rel='preconnect'/>
<link href='//fonts.gstatic.com' rel='dns-prefetch'/>
<link href='//fonts.gstatic.com' rel='preconnect'/>
<link href='//itisuniqueofficial.github.io' rel='dns-prefetch'/>
<link href='//itisuniqueofficial.github.io' rel='preconnect'/>
<link href='//www.blogger.com' rel='dns-prefetch'/>
<link href='//www.blogger.com' rel='preconnect'/>
<link href='//pagead2.googlesyndication.com' rel='dns-prefetch'/>
<link href='//pagead2.googlesyndication.com' rel='preconnect'/>
<link href='//googleads.g.doubleclick.net' rel='dns-prefetch'/>
<link href='//googleads.g.doubleclick.net' rel='preconnect'/>
<link href='//www.gstatic.com' rel='dns-prefetch'/>
<link href='//www.gstatic.com' rel='preconnect'/>
<link href='//firebase.google.com' rel='dns-prefetch'/>
<link href='//firebase.google.com' rel='preconnect'/>
<link href='//translate.googleapis.com' rel='dns-prefetch'/>
<link href='//translate.googleapis.com' rel='preconnect'/>
<link href='//1.bp.blogspot.com' rel='dns-prefetch'/>
<link href='//1.bp.blogspot.com' rel='preconnect'/>
<link href='//2.bp.blogspot.com' rel='dns-prefetch'/>
<link href='//2.bp.blogspot.com' rel='preconnect'/>
<link href='//3.bp.blogspot.com' rel='dns-prefetch'/>
<link href='//3.bp.blogspot.com' rel='preconnect'/>
<link href='//4.bp.blogspot.com' rel='dns-prefetch'/>
<link href='//4.bp.blogspot.com' rel='preconnect'/>
<link href='//cdn.itisuniqueblog.com' rel='dns-prefetch'/>
<link href='//cdn.itisuniqueblog.com' rel='preconnect'/>
<link href='//www.google-analytics.com' rel='dns-prefetch'/>
<link href='//www.google-analytics.com' rel='preconnect'/>
<link href='//adservice.google.com' rel='dns-prefetch'/>
<link href='//adservice.google.com' rel='preconnect'/>
<link href='//www.googletagservices.com' rel='dns-prefetch'/>
<link href='//www.googletagservices.com' rel='preconnect'/>
Step #4: Finally save you theme and they are code applied.
DNS Prefetch Markup For WordPress
If you want add more DNS Prefetch markup in you can use below codes in below code which markup is work for which function.
<!-- WordPress.org  -->
<link rel="dns-prefetch' href='//s.w.org">
<!-- Gravatar -->
<link rel="dns-prefetch" href="//0.gravatar.com/" />
<link rel="dns-prefetch" href="//2.gravatar.com/" />
<link rel="dns-prefetch" href="//1.gravatar.com/" />';
<!-- Google CDN -->
<link rel="dns-prefetch" href="//ajax.googleapis.com">
<!-- Microsoft CDN -->
<link rel="dns-prefetch" href="//ajax.microsoft.com">
<link rel="dns-prefetch" href="//ajax.aspnetcdn.com">
<!-- CDN JS -->
<link rel="dns-prefetch" href="//cdnjs.cloudflare.com">
<!-- Bootstrap CDN -->
<link rel="dns-prefetch" href="//netdna.bootstrapcdn.com">
<!-- Google Tag Manager -->
<link rel="dns-prefetch" href="//www.googletagmanager.com">
<!-- Google Analytics -->
<link rel="dns-prefetch" href="//www.google-analytics.com">
<!-- Google Fonts -->
<link rel="dns-prefetch" href="//fonts.googleapis.com">
<!-- Facebook -->
<link rel="dns-prefetch" href="//connect.facebook.net">
<!-- Google+ -->
<link rel="dns-prefetch" href="//apis.google.com">
<!-- Linkedin -->
<link rel="dns-prefetch" href="//platform.linkedin.com">
<!-- Twitter -->
<link rel="dns-prefetch" href="//platform.twitter.com">
<!-- Amazon S3 -->
<link rel="dns-prefetch" href="//s3.amazonaws.com">
<!-- BuySellads -->
<link rel="dns-prefetch" href="//cdn.adpacks.com">
<link rel="dns-prefetch" href="//s3.buysellads.com">
<link rel="dns-prefetch" href="//stats.buysellads.com">
Use only need "dns-prefetch" don't use unknown "dns-prefetch", But you should use WordPress or Google Service DNS Prefetch markup.
How to use DNS Prefetch In WordPress?
Simply put this code in your function.php always use child theme so whene update avaliable for main theme it does not mess the custamization.
Step #1: Login your WP Account go to WordPress Dashboard.
Step #2: In Dashboard click Appearance > Editor.
Step #3: Now find function.php or Child's Theme function.php file from the right column and indirectly function.php opens.
Step #4: Now add the following DNS prefetching markup.
//* Adding DNS Prefetching in WordPress By ItIsUniqueBlog.Com
function stb_dns_prefetch() {
echo '<meta http-equiv="x-dns-prefetch-control" content="on">
<link rel="dns-prefetch" href="//fonts.googleapis.com" />
<link rel="dns-prefetch" href="//fonts.gstatic.com" />
<link rel="dns-prefetch" href="//0.gravatar.com/" />
<link rel="dns-prefetch" href="//2.gravatar.com/" />
<link rel="dns-prefetch" href="//1.gravatar.com/" />';
}
add_action('wp_head', 'stb_dns_prefetch', 0);
Step #5: Now click on Update File It's All Done.
Where You Can Test External Domain Links Test?
After adding DNS Prefetch and Preconnect, you can test your website using tools like Pingdom or WebPageTest. These tools will show you how your website connects to external domain links and the size of your webpage content for loading.
After testing your website, You see number result where from resources load in your website. In case webpagetest.org after finishing the test from top above navigation tap on domain section you will see external subdomains and domains list with the number of requests.
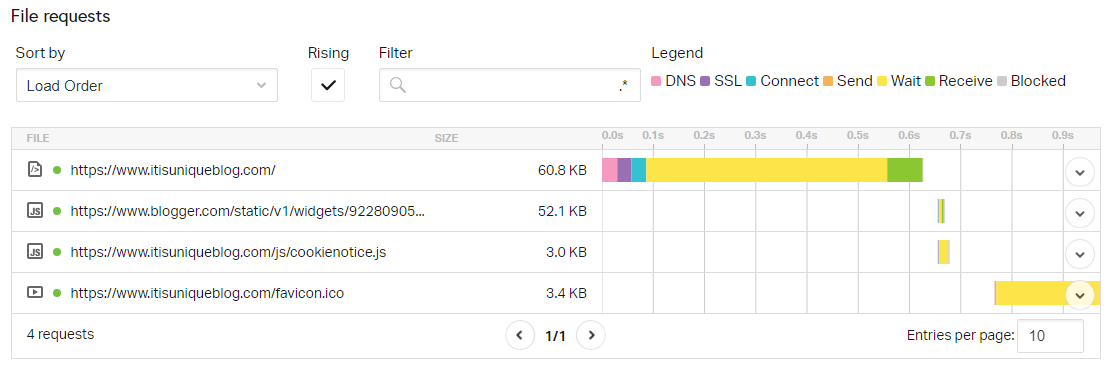
If you runs test on Pingdon Tools then you see details in present page. Just scroll and check out detailed result.
In Conclusion:
DNS Prefetch (rel='dns-prefetch') and Preconnect (rel='preconnect') are powerful elements in HTML5 that improve your webpage speed. However, the speed increase they provide is small. There are different types of DNS Prefetch and Preconnect, and not all of them work the same way.
For example, if you use Google Analytics, include the Google Analytics code. If you don't use it, then don't include the code. However, since most Blogger websites use Google Analytics, you should use DNS Prefetch or Preconnect for it.
Blogger platform users should use specific DNS Prefetch or Preconnect markup because it's really needed for their Blogger site.